I never thought I would describe bread as adorable, but seriously, look at this little pound cake. So cute! I wouldn’t want to eat it:
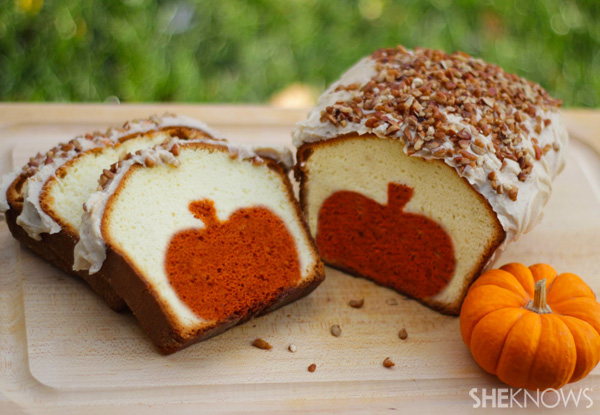
I never thought I would describe bread as adorable, but seriously, look at this little pound cake. So cute! I wouldn’t want to eat it:

Source: allrecipes.com via Emily on Pinterest

Source: thatssomichelle.com via Emily on Pinterest

Source: willowbirdbaking.com via Emily on Pinterest
One of the results from my baking day yesterday:
Sunflowers! They came out pretty cute, though, they use a TON of frosting. And I probably should have done a third level of leaves to cover up the bases of the Oreos a little more, but at that point I was pretty much done with frosting. I found the original inspiration on Pinterest – these look much better than mine:

Source: ohcupcakes.net via Emily on Pinterest
These were a total cheat – I used a yellow cake mix with a honey greek yogurt, 1 cup of water, and 1 egg white. They baked for about 20 minutes at 350 degrees and then I frosted them with vanilla frosting out of the can. I did mix in a little lemon pudding mix, lemon extract, and yellow food coloring to make the frosting more lemon flavored. I used a Wilton leaf tip (I think it’s #352?) to frost and then stuck the Oreos on top. I didn’t actually eat one but Sista and Hubby approved. Unfortunately the frosting out of the can is very soft and not great for piping leaves. If I were to make these again in the future, I would make an actual buttercream frosting that’s a little thicker. And maybe attempt to add in some green leaves, as well.
It felt good to do some baking again! Who knows when I’ll be able to make cupcakes in the future :)

I actually made these a few weeks ago but since they’re not specifically holiday themed, I thought it would be okay to post these after the new year. I found the inspiration for these on Pinterest, but I changed the cupcake recipe. The cake batter I used is made of a box of Devil’s Food chocolate cake mix, 2 egg whites, 1 1/3 cups water, 1 6oz vanilla Chobani yogurt, 4 tablespoons of unsweetened cocoa powder, 1 teaspoon ground cinnamon, and 1 teaspoon of nutmeg. Mix all ingredients together for 2 minutes on medium speed, pour 2/3 full into cupcake liners and then bake for about 20-25 minutes at 350 degrees. EASY!
The peppermint buttercream frosting is also an easy recipe – this I took right from The Sweet Life and you can find the recipe here.
Once the cupcakes were cool, I just used a spatula to frost them so they were purposely messy. After that, I still had leftover candy canes so I broke them into 3 pieces and stuck them into the cakes for a little extra decoration. I also added a few mini marshmallows so they resemble the top of a mug with whipped cream. My favorite part is the frosting – it’s sweet and minty and rich and goes perfectly with the chocolate cupcake. Perfect for a winter party or get-together!
Sharing at Tatertots & Jello, I Heart Naptime, Be Different…Act Normal
Another Pinterest find that I knew I needed to make this holiday season:

Source: flickr.com via Emily on Pinterest
Those look easy enough, right? Just a little piping on top of a cupcake with some candy added. Well let me tell you how freaking hard it is to find those little green jelly candies! I went to Target and Hannafords with no luck. Finally found some green jelly trees at CVS last night, so I cut those in half to make leaves. I used red M&M’s as the berries since I still had some leftover from my reindeer cookies. However, the M&M’s started to melt and left red coloring on top of the pretty white frosting. UGH! Next time I’ll be using gumballs or some kind of other red candy.
Here’s my version – I did a red velvet cupcake (cake mix + a Chobani vanilla yogurt + 1 1/3 cups water + 2 egg whites) and then a light cream cheese frosting:

Before the M&M’s started bleeding….

Whatever, at least they tasted good!
Remember how I made Hula Bear cupcakes and cake earlier this year? Well I was just browsing Foodgawker and came across this picture for a swimming pool cake.

image source from alanabread
It’s a very similar idea to what I did, minus the ocean theme, so I wouldn’t have to include the Nemo fruit snacks or chocolate flavored Goldfish. I love the idea of adding the cookies around the base of the cake to make the actual pool. And that candy ladder – oh it’s so cute! After reading through the recipe, it’s a little unique because the blue filling is jelly…I think I would just skip that and do lots of frosting instead :)
Is it bad I’m already thinking of things to make for pool parties next summer? We’re not even close to being started with winter yet…
Okay so this isn’t a real alcoholic drink, but it’s a very cute idea for a party – Margarita Shortcakes! Head on over to SewSweetTV to find out how to make these yummy desserts!

Found these on Be Different, Act Normal today:

The melted green chocolate blobs totally remind me of The Wizard of Oz (can I just saw how scared I used to be of the flying monkeys in that movie????)
Not sure if these would work for a party, but they would be very cute for favors or something for kids to bring to class to share. I’ve never been much of a Halloween fan but I just love these cute little hats. Find out how to make them at Confessions of a Cookbook Queen.
I made these crepes a couple months ago and I completely forgot to post about them. When Hubby and I were in Mexico for our one year anniversary trip, I ordered Nutella crepes at one of the restaurants for breakfast one morning. I usually would order pancakes but it was such a good switch getting those crepes – they were light, full of Nutella and cream cheese, and the whipped cream on top was heaven. I know their crepes definitely were not healthy, so once we got home I went on a search to find something a little less fattening :)

I know strawberry season is almost over, but I definitely recommend trying these ASAP! They are actually pretty easy to make once you practice. I think the key is just to using a small frying pan so your batter fills the entire surface area of the pan. The Nutella is an amazing addition for the filling and I can’t believe I had never tried Nutella before trying out this recipe.
Anyways, head over to Handle the Heat for the full recipe and how-to’s on making a perfect crepe!
I’ve seen a ton of recipes for margarita cupcakes this summer on many of the blogs I frequently visit. However most of the recipes I found were making the cupcakes from scratch and since I was planning on making these for a co-worker’s birthday, I wanted something that could use a cake box mix. I always use the cake box mix and diet soda recipe when making things for work because it uses less ingredients (I usually need to stay under $30 when making cakes/cupcakes for work since I get compensated for whatever I spend on ingredients).

While the actual cupcakes don’t taste exactly like a margarita, they are full of lime flavor and are very light which is perfect for a summer dessert. The frosting is a buttercream with lots of lime juice and zest added in and a hint of tequila. I think next time I would actually add in even more tequila to both the cupcakes and buttercream to amp up the flavor a bit :)
Easy Margarita Cupcakes
Ingredients:
Let’s get baking!
I feel like everyone has a different recipe for buttercream – some use more powdered sugar while other use more butter, so just make whatever buttercream you are most comfortable with. To add the tequila flavor, mix the buttercream with 2 tablespoons of tequila, 1 tablespoon lime juice and 1 tablespoon of lime zest. I added even a little more lime zest after so you can see the little green flakes once you are decorating the cupcakes :) After frosting, use lime slices for garnish.
Wow, I am SO behind on some recipe reviews. This cake was something I made for an Easter dessert a few months ago:

I did want to share this, though, because it’s incredibly easy to make. Mix a box of spice mix, can of diet root beer, 1 cup of shredded carrots, 2 egg whites, and a couple teaspoons of cinnamon and nutmeg according to the cake box directions, and then pop in the oven for about 25 minutes or until a toothpick comes out clean.
For the icing, I mixed 8 oz. of reduced fat cream cheese with 1 cup of powdered sugar. It should be slight runny, which is good so it’s more of glaze than a frosting. After icing the cakes, I sprinkled some nutmeg and cinnamon on top.
This cake has the perfect amount of spice and is incredibly moist because of using the diet soda method. Enjoy!
I made this cake awhile ago and just keep forgetting to post the recipe. The cake uses the “diet” recipe concept, and the “frosting” is actually vanilla pudding mixed with some peppermint extract that’s colored a bright green for a minty hue. Crush some Oreos, sprinkle on top, and you’re good to go! It’s incredibly simple to put together – perfect for a last-minute party or occasion you need to bring a dessert to.

I will be honest – I did not actually try the cake. I made it for Hubby to bring to work when they did a potluck lunch and I left it in the pan it was baked in, so I didn’t even get to sneak a piece before I sent it off. However, all his co-workers were raving about how good it was, and since there were no leftovers brought back home to me, I’m thinking that’s a good thing :)
Mint Chocolate Oreo Cake
Ingredients:
Let’s Get Baking!

A couple notes - I made this cake the night before and I’m assuming the Oreos got a little soggy while chilling in the fridge on top of the pudding cake. It may actually be better that they were softer, but that might be a change you would like to make. You would just need to crush the Oreos ahead of time and then add them to the top right before serving. Also, I left the cake in the pan after it cooled so it was easy for transportation and then the pudding could continue to set on the cake overnight. Not the prettiest presentation option, so I think I would try baking this in a glass pan next time.
Sharing at: Tatertots & Jello, Be Different Act Normal, I Heart Naptime
When warm weather finally comes in New England, there’s something that many of us look forward to….Dairy Queen opens for the season! The only thing I ever order at Dairy Queen is the “twist” soft serve dipped in their their chocolate shell. Sooooooo good. And it so happens that one of the food blogs I check every so often posted a recipe for homemade chocolate shell ice cream topping. How amazing does this look from Handle the Heat?
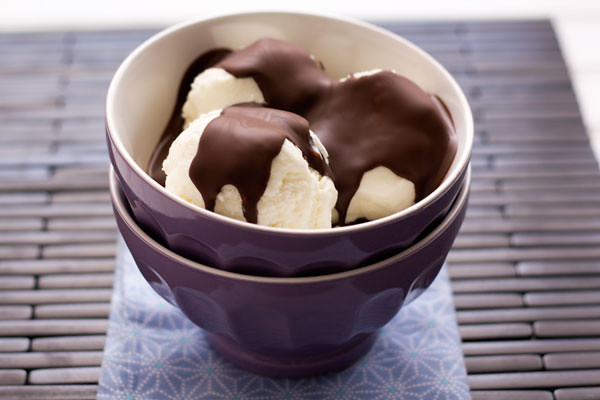
Now I just need to find some coconut oil – guess I will be taking a trip to Whole Foods during a lunch break this week!
Super easy recipe…
Pour a can of diet cherry coke into a large mixing bowl. Add a box of chocolate cake mix. Add an egg white or two to help everything bind. Mix according to box directions. Pour into cupcake liners. Bake for about 15-20 minutes at 350 degrees.
They’re so good you don’t even need to frost them. I made a batch of these for work and did add a little cream cheese frosting and a maraschino cherry on top for decoration (they were the only cherries I could find in the store…weird). The cake itself has just a hint of cherry, definitely not overpowering.
Yes, I know they’re still not “GOOD” for you. But they’re lower cal compared to making the mix with the normal oil required, so it’s good enough for me. I honestly like the diet soda mixes better, because they make the cake so moist (ugh I hate that word)…let’s use fluffy and light instead :)
Check out Grin and Bake It, as this is where I got the inspiration to make these lovely cakes!
How cute are these?!

They are Mini Mexican Wedding Fruit Pizzas – love how petite they are! It’s a nice way to do something more original than just a fruit salad or platter. Go over to Cooking al[a] Mel for the recipe and more pictures. She also included a great list of other finger foods to make, as the fruit pizzas were for a bridal shower. I can’t wait to try making these for a future party.
For another co-worker’s birthday a few weeks ago, I made a strawberry lemonade cake filled with pureed strawberries and frosted with strawberry cream cheese frosting. It was a huge hit at work and everyone keeps asking me for the recipe now. One of my co-workers described it as “eating summer”. And more than one person said it was better than Whole Food’s version – huge compliment!

This cake is so easy to make and it’s very moist. A couple tips – first, make sure the cake pans are greased VERY well. The cake stuck to the bottom, but not the sides, and was hard to get out. You might want to use a little shortening on the bottom, as I only used non-stick spray and that apparently wasn’t enough. I use the Wilton baking strips, which is probably why the cake didn’t stick to the sides. I highly recommend buying the strips as my cakes bake evenly every time and I almost never have to level the tops off after they bake.
Second, do not decorate with strawberry slices until you are about to serve the cake. I decorated mine the night before and forgot that strawberries contain lots of water…had a little mess the next day :)

Strawberry Lemonade Cake (Adapted from CakeCentral.com)
Ingredients:
Directions:
Strawberry Filling
Ingredients:
Directions:
Strawberry Cream Cheese Frosting (Adapted from Annie’s Eats)
Ingredients:
Directions:
Sharing at: I Heart Naptime, Tatertots & Jello, Paisley Passions, Be Different…Act Normal
Saw this and instantly thought of summer nights:
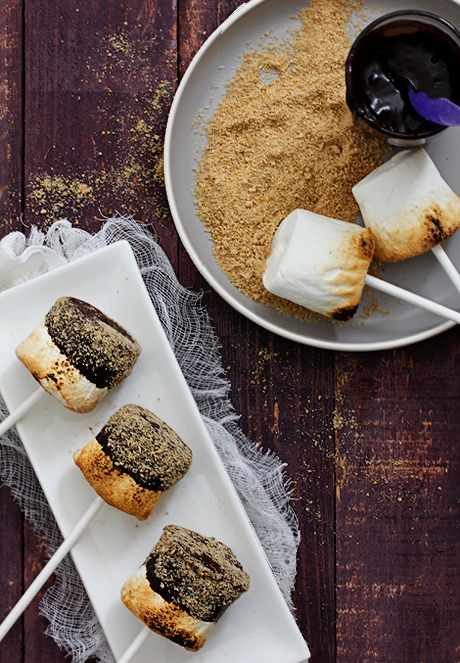
A non-messy way to eat s’mores???? Count me in! These cute little s’mores pops would be perfect for a summer party. Even though these pops didn’t require a bonfire for toasting (they were browned using an oven flame of a stove top), I think I will wait to try these once we get a firepit this year (hint, hint Hubby). Go on over to Bakers Royale to see more.
Hopefully that snow last Friday was the last of the season and we can finally get some warm weather around here! I’m dying to break out my flip-flops and skirts :)
I was asked to bake a cake for one of my co-worker’s birthdays in March so I decided to finally try out a decorating idea I had saved from a blog I found last summer – check it out here at Grin and Bake It. Basically you just decorate little Teddy Grahams in bikinis and grass skirts and then decorate the cupcakes with a beach/ocean theme.
Cake tends to go fast at work, so I made two 9 inch cakes (stacked them) and then cupcakes, as well. I went with Funfetti for the cake as that is her favorite kind and decided to make chocolate cupcakes for any of the chocolate lovers at work. No crazy recipes for this – just used boxes of Funfetti and chocolate fudge. I made a couple batches of the Wilton buttercream recipe since I knew this type of decorating would need a thicker frosting. I also used a tub of the Funfetti frosting for the filling between the two cake layers as you can’t have a Funfetti cake without the frosting!
First, here are the cupcakes – they came out so cute!


To make sand, I crushed graham crackers in a big ziplock plastic bag with a potato masher until they were very crumby. I used gummy Life Savers for the inflatable tubes the bears are swimming in. For the waves, I used the Wilton tip #1M that is used to make big swirls on cupcakes. Instead of doing a swirl, I just made 2 or 3 lines and zig-zagged across the cupcake as I frosted so they were wavy. All of the decorating materials I found at Walmart and Target – including Pepperidge Farm chocolate and marshmallow-flavored Goldfish and Finding Nemo fruit snacks (yes, that’s Nemo in the above pic!).
To actually decorate the Teddy Grahams, I used the Wilton piping tip #1 and buttercream frosting. I started by outlining two triangles for the bikini part and then used a toothpick to fill in the rest of the triangle. Then I made small lines as straps to connect the bikini. For the grass skirts, I used a different Wilton tip that is most commonly used to make grass or the mum type of flowers (I can’t remember the # of the tip but it has several small holes in it). I dragged the frosting a little so it would cover the entire legs of the bear.
Here’s some pictures of the cake…for some reason, I don’t have a picture of the entire cake but hopefully you get the idea:


I started by frosting the entire cake in the blue frosting (including the top). I then mixed a little orange icing coloring into some white frosting and carefully layered the orange frosting on top of half of the cake. This was just so the frosting wouldn’t show as much when I put the crushed graham crackers crumbs on top for the beach half. For the ocean, I used a little piping gel to smooth over the top of the ocean. I dipped a toothpick in royal blue icing color to make swirls in the ocean so it was more wave-like.
The bears laying on the beach are laying on Airheads. I melted those in the microwave for about 5 seconds (any longer and they get too melty!), cut them in half, and formed a little pillow at the top by folding over part of the Airhead. I used more of the chocolate flavored Goldfish to decorate the base of the cake. Some drink umbrellas were used to decorate the beach part.
This was very popular at work – the birthday girl and everyone else loved it :) It definitely took a long time to decorate the bears but other than that, it wasn’t too difficult to make all the other components. I would suggest making the bears and just the cakes one day and store them in airtight containers overnight. Then on the next day, make all the frosting and actually decorate the cakes. Happy decorating!
Sharing at:


