Wednesday, August 31, 2011

Cuteness – Cheese & Cracker Inspiration

Planning to serve cheese and crackers at your next party or get-together?  Why not dress them up a little?

image source

I found this image via Foodgawker on Cute Food for Kids.  All you need is a Laughing Cow wedge (my fav!), crackers, and an olive.  Apparently you use a straw to poke out little buttons and scissors to cut out the bow from the olive.  I’m curious to find out how long this really takes and if it’s worth the time, but the overall effect is pretty charming :)

Cute Food for Kids is a great site and includes a ton of ideas that you can easily modify so they’re not so kid-ish.  I also love her ideas for a Melted Marshmallow Snowman and an Apple O’Latern.  Check them out!

BlogSignature

Tuesday, August 30, 2011

Recipe Review – Nutella & Strawberry Crepes

I made these crepes a couple months ago and I completely forgot to post about them.  When Hubby and I were in Mexico for our one year anniversary trip, I ordered Nutella crepes at one of the restaurants for breakfast one morning.  I usually would order pancakes but it was such a good switch getting those crepes – they were light, full of Nutella and cream cheese, and the whipped cream on top was heaven.  I know their crepes definitely were not healthy, so once we got home I went on a search to find something a little less fattening :)

crepes

I know strawberry season is almost over, but I definitely recommend trying these ASAP!  They are actually pretty easy to make once you practice.  I think the key is just to using a small frying pan so your batter fills the entire surface area of the pan.  The Nutella is an amazing addition for the filling and I can’t believe I had never tried Nutella before trying out this recipe.

Anyways, head over to Handle the Heat for the full recipe and how-to’s on making a perfect crepe!

BlogSignature

Monday, August 29, 2011

Monday Musings

“A vacation is having nothing to do and all day to do it in.”  ~Robert Orben

emja036

Spending the week in my favorite place with my favorite person…

doesn’t get better than this :)

image source

BlogSignature

Recipe – Margarita Cupcakes

I’ve seen a ton of recipes for margarita cupcakes this summer on many of the blogs I frequently visit.  However most of the recipes I found were making the cupcakes from scratch and since I was planning on making these for a co-worker’s birthday, I wanted something that could use a cake box mix.  I always use the cake box mix and diet soda recipe when making things for work because it uses less ingredients (I usually need to stay under $30 when making cakes/cupcakes for work since I get compensated for whatever I spend on ingredients).

Picture 060 

While the actual cupcakes don’t taste exactly like a margarita, they are full of lime flavor and are very light which is perfect for a summer dessert.  The frosting is a buttercream with lots of lime juice and zest added in and a hint of tequila.  I think next time I would actually add in even more tequila to both the cupcakes and buttercream to amp up the flavor a bit :)

Easy Margarita Cupcakes

Ingredients:

  • Box of white cake mix
  • 2 egg whites
  • can of diet Sprite or 7-up (you will only need about 10 oz, though)
  • 1 tablespoon of lime juice
  • 1 tablespoon of lime zest
  • 1 tablespoon of tequila

Let’s get baking!

  • Preheat oven to 350 degrees.  Prepare muffin tins with cupcake liners.
  • In a large mixing bowl, mix cake mix, egg whites, and 10 ounces of diet soda together for about 2 minutes on medium speed. 
  • Add in lime juice, zest and tequila and mix well until completely blended with cake mix.
  • Pour mixture evenly into cupcake liners, filling about 2/3 up.
  • Bake for 15-20 minutes or until a toothpick inserted in the center comes out clean.
  • Let cool for at least 30 minutes before frosting.

I feel like everyone has a different recipe for buttercream – some use more powdered sugar while other use more butter, so just make whatever buttercream you are most comfortable with.  To add the tequila flavor, mix the buttercream with 2 tablespoons of tequila, 1 tablespoon lime juice and 1 tablespoon of lime zest.  I added even a little more lime zest after so you can see the little green flakes once you are decorating the cupcakes :)  After frosting, use lime slices for garnish. 

BlogSignature

Sunday, August 28, 2011

A Maine Wedding: Some Bridal Portraits

I’m never a fan of pictures of just me.  Whenever I choose pictures for my Facebook profile, it’s never a picture of only me; there has to be at least someone else in the photo.  Needless to say I’m not totally comfortable with the below bridal pictures, but it is nice to look back on them and think “wow, all the details and inspiration pics I searched for months finally came together.”  These were taken before the ceremony, and strangely enough I do look calm even though my stomach was doing flips. 

ProfWeddingPictures 117   ProfWeddingPictures 119  ProfWeddingPictures 121

I chose a half up, half down for my hairstyle to showcase my long curly hair.  I had kept it long for a few years at that point but once we were engaged, I knew I wouldn’t be cutting it until after the wedding.  My hair holds curls extremely well, so they lasted basically all night and didn’t get too frizzy until the end :)

ProfWeddingPictures 122

For my make-up, I was originally thinking of doing more purple and pinkish tones for the eyeshadow and blush.  However my make-up artist went with neutral peach and brown tones for my rehearsal I did about a month before the wedding.  I loved the outcome and she did an even better job the day of.  The peaches really made my blue eyes pop, and I appreciated how the make-up was subtle but very polished.

ProfWeddingPictures 124   ProfWeddingPictures 127

It was time to double-check the hair and make-up one last time and ensure everything was in its place.  At this point my parents joined my bridesmaids in the room so we could all walk together to the main house of the inn.  My girls grabbed their bouquets and off we went to get ready for the ceremony.

 ProfWeddingPictures 129 ProfWeddingPictures 130

See the building I came out of? So our bridal suite for the night was on the bottom and Hubby and his groomsmen were actually getting ready in the room right above us.  Hubby was SO adamant about not seeing me until I walked down the aisle and I was fine with this, but it was a little tricky maneuvering us in and out of rooms at the small inn to make sure we didn’t see each other that entire day:)  Shortly after I left and made my way to the main house, Hubby was given the okay to finally come out of his room and head down to the ceremony.

  ProfWeddingPictures 132 

Next up: Our Ceremony - Part 1.

BlogSignature

Saturday, August 27, 2011

Fifth Month – Losing It!

Monthly weight loss re-cap time.  I’m disappointed again with the numbers but I’ve realized it’s going to be harder and harder to lose these last 10 pounds.  Technically I really only have about 7 more to go before I reach my goal, but I’m been fluctuating up and down the past 2 weeks and haven’t seen a significant loss in a while.  Here’s the stats:

  • Down 4.2 pounds since last month
  • Down a total of 27.8 pounds since March 27th

I feel great and a lot of my clothes are staring to get too loose.  I’m actually starting to put them in boxes to save them as maternity clothes for the future!  And best thing ever last week: Old Navy was having a jeans sale and I bought a pair in a size smaller – oh yeah!  I usually dread trying on jeans.

Some changes I’ve made to my weekday meal routine:

  • I have had to cut back on snacks since I’m getting less calories as I lose weight.  It’s been a little hard to adjust lately, but I think I’m getting the hang of it.
  • I switched to eating plain, regular oatmeal – no brown sugar, apples, cinnamon, etc.  It’s not as bland as I thought it would be and sometimes I use just a packet of Trevia to make it sweeter.
  • I eat a cup of apple slices and a tablespoon of Better N’ Peanut Butter for breakfast, as well.  This combined with the oatmeal usually keeps me full until about noon or so.  I love this peanut butter – 100 calories and only 2.5 grams of fat per serving.  I found it at Trader Joe’s and it’s a little pricey at $4 a jar but it’s worth it.

image source

Goals for next month:

  • Continue with exercising at least three times a week
  • Try out the elliptical when I go to the gym with Sista
  • Drink a Vitamin water each day at work – I bought a lot at Target when they were on sale last month and they’ve just been sitting in one of my drawers at work

C’mon last 7 pounds, let’s lose you!

BlogSignature

Tuesday, August 23, 2011

Fruit Slice Jell-o Shots

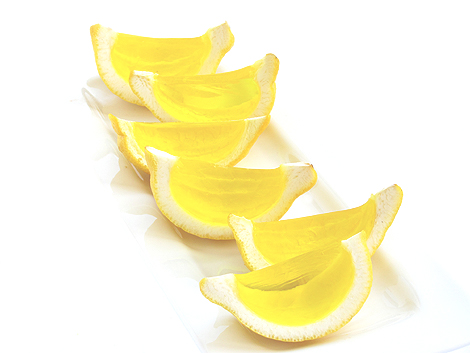
Bakers Royale is one of my favorite blogs to visit when I’m looking for something unique and creative to make for a party.  She comes up with the coolest stuff, including the ultimate Jell-o shots.  She has a few different ideas for them, but the ones I knew I had to try were these Lemon Drops:

image source from Bakers Royale

We had an annual BBQ to attend this summer and we always volunteer to bring Jell-o shots, so I decided to up my game a little.   I made several flavors and used not only lemons, but limes and oranges, as well.  What can I say, these were a HUGE hit.  They do take a little while to make, so I suggest starting them the night before and then setting the Jell-o overnight.  Your basic steps are:

    • Buy 10 lemons, 10 limes, 10 oranges (you really only need 7-8 per batch, but I bought extras), and 4 or 5 boxes of BRAND NAME Jell-o (do not buy the store brand or sugar free stuff)
    • Cut your lemons/limes/oranges in half.  (I tried both the “long” and “short” ways, and it does not matter)
    • Using a paring knife, CAREFULLY loosen the skin inside your fruit.  If you poke too far down, you will make a hole through the outer peel and then it’s no good :(

Picture 035

  • Squeeze as much juice as you can out of the fruit.  This will help with the “scooping out” process later on. 

Picture 037

  • Scoop out the pulp and excess skin. 
Picture 038     Picture 039

  • Get your Jell-o recipe ready!  (Follow normal directions and replace water with alcohol – for recipe suggestions, check out this site: http://www.myscienceproject.org/j-shot-3.html
  • I used muffin tins and cupcake holders to place the fruit cups into.  I also used some dry pasta noodles to help stabilize some of the cups.
  • Pour Jell-o into each fruit cup.  Fill it up as much as you can, and even overfill a little.  When the Jell-o starts to mold, the amount will go down and it looks better when they’re filled as much as possible.

Picture 033

  • CAREFULLY move the fruit cups into the fridge. 

Picture 041

    • Let the fruit cups set overnight in the fridge. 
    • The next morning, use a very sharp (not serrated) knife to cut the fruit cups into quarters. 

Picture 052


    • Serve them within a couple hours after taking them out of the fridge (I brought them in several Tupperware containers filled with ice to the BBQ and they stayed pretty well set for a few hours even in the hot sun!)

Here are all the flavors I made:

05

Strawberry Lemonade – strawberry Jell-o + 3/4 cup lemon vodka, 1/4 cup cold water

 Picture 043

Lemon Drops – lemon Jell-o + 3/4 cup lemon vodka, 1/4 cup cold water


04

Watermelons!  watermelon Jell-o + 1/2 tequila, 1/2 cup cold water


06 

Orange slices – tropical fusion Jell-o + 3/4 cup Malibu rum, 1/4 cup cold water


I also made a batch of non-alcoholic Raspberry Lemonade shots, since one of our friends is pregnant, so she wouldn’t feel left out :)  Everyone was totally excited to try these out, and I have to admit, they’re a lot easier to eat like this!  Much more sanitary when you don’t have to poke your finger in the shot container to wiggle out the Jell-o.  I’m not sure how I can top these for next year, so I guess I’ll just be experimenting with different flavors…mmmmm!

Sharing at: I Heart Naptime, Be Different…Act Normal, Tatertots & Jello, Someday Crafts 

BlogSignature

Wednesday, August 17, 2011

Beach Rental House Packing List (Printable)

To celebrate the end of summer last year, we went away for Labor Day weekend to one of our favorite towns in Maine - York Beach.  We decided for this year to spend an entire week at the beach and realized it would be more cost-effective to rent a house instead of staying at a hotel for 7 nights. 

Since I’m OCD with being organized and I love lists (wayyyyy too much), I started making a serious packing list for our beach rental.  I began with doing a Google search for some ideas since we have never rented a house before, but the search really didn’t come up with much.  I only found a couple links that were somewhat useful from some discussion boards:  http://www.dcurbanmom.com/jforum/posts/list/114311.page and http://chowhound.chow.com/topics/313529

Luckily we just visited some friends at their lake house in NH last weekend, so we were able to see what was included in that house and get a better idea of things we should consider packing.  Their house was very well stocked, but it did take some time to find basic cooking utensils, so I think it may be easiest to pack a box of our own kitchen things and bring it along.  It also seems like it may be hit or miss with how new the pots and pans are, so I decided we should at least bring our flat frying pan for making pancakes.  

Here is the list I came up with – I decided it was easiest to break it into sections.  It quickly went from one page to two as I started adding beach and bathroom items, but I don’t think there’s much I missed.  I did add extra lines to handwrite items on in case I think of something later on or the day before we leave.


Beach Rental House Packing List Aug 2011

Feel free to download the list for your own personal use – just click on the link above the list and it will bring you to the site where you can print or save to your computer.  Hopefully this will help someone else before the summer ends :)

Or right-click the pictures below to save to your computer:

Beach Rental House Packing List page 2 Beach Rental House Packing List Page 1

Sharing at: I Heart Naptime, Someday Crafts, Tatertots & Jello, Be Different…Act Normal

BlogSignature

Monday, August 15, 2011

Monday Musings

“Just so easy when the whole world fits inside of your arms
Don't really need to pay attention to the alarm
Wake up slow, yeah wake up slow
You hardly even notice when I try to show you this
Song is meant to keep ya from doing what you’re supposed to
Like waking up too early, maybe we can sleep in
I'll make you banana pancakes, pretend like it's the weekend now


rain 

image source


And we could pretend it all the time
Can't you see that it's just raining, ain't no need to go outside
Ain't no need, ain't no need, rain all day and I really really really don't mind
Can't you see, can't you see, you gotta wake up slow”

- “Banana Pancakes” by Jack Johnson


BlogSignature

Sunday, August 14, 2011

Weekly Menu 8/15/11-8/21/11

BlogWeeklyMenu


Monday 8/15 – Chicken Burgers from Trader Joe’s

Tuesday 8/16 -  Tortellini w/Garden Vegetables

Wednesday 8/17 – Bruschetta Chicken & Roasted Potatoes

Thursday 8/18 – Turkey Stuffed Peppers

Friday 8/19 - Honey Mustard Chicken Salad

Saturday 8/20 – BBQ at my parent’s house

Sunday 8/21 – Turkey Club Pie

BlogSignature

Saturday, August 13, 2011

Wednesday, August 10, 2011

DIY – Baby Onesie Cupcakes Tutorial

Back in March I mentioned how we would soon be going to baby showers instead of bridal showers because of all the weddings we’ve gone to the past few years.  Well, it’s starting already!  As soon as I received the invitation to one of our best friends’ baby showers, I knew I would finally get the chance to try out making a diaper cake.  If you remember, I posted about how I wanted to try this crafty project awhile ago.

Once I got thinking about it a little more, I figured that someone else may also bring a diaper cake since they are fairly popular now, so I decided to think of something more original.  I did a Google search for images first and discovered some good sites for making diaper cupcakes instead of a whole cake.  After a little more research, I found the idea for doing Onesie cupcakes – genius!  Since our friends know they are expecting a girl, I loved the idea of how I could still buy cute clothes and work them into a craft. 

I checked out a couple tutorials on how to construct these adorable little things - I liked Little Birdie Secrets’ post and Glitz & Grits’ ideas.  Next I went to Target to get the onesies and then to Michaels with a 20% off coupon to stock up on materials.  You will need:

  • 4 onesies (I bought ones that were 3-6 months old)
  • cupcake box big enough for 4 cupcakes
  • jumbo white cupcake liners (I went big to make sure the onesies would fit inside)
  • small bag of filler confetti (you don’t need too much)
  • white ribbon (about 1 inch width)
  • narrow ribbon (1/4 inch or less width) – color doesn’t matter, but I used pink and white
  • small rubber bands
  • sewing pins
  • scissors
  • scrapbook paper (optional)
  • regular sized cupcake liners (optional)

To get started, first lay out your onesie and have a rubber band ready.  My onesie had a little applique on the front and I discovered it’s best to fold the onesie so the applique is on the inside.

Picture 007

Fold the onesie into thirds the long way.

Picture 010 

Then fold that into halves the long way again so you have a narrow strip.

  Picture 011

Take one end and start rolling the onesie to form a spiral roll.  This takes some practice and you probably won’t like your first couple tries (at least I know I didn’t!).  I tried to roll slightly diagonal so a little fabric would pop up at the top.

Picture 012Picture 013

I don’t have a picture of the next step, but then you will put a rubber band to secure the onesie at the bottom.  I then cut a piece of white ribbon to fit length-wise around the bottom of the onesie to hide the rubber band.  If you are using clear bands, you might be able to skip this step, however, I think it looks a little neater when placing it into the cupcake liner.  I actually used 2 liners (one was yellow to give a little color), but that’s optional. 

Picture 014Picture 016

Once you are done with placing the cupcake in the liner, repeat the steps with the other onesies until you have 4 little cupcakes :)

Picture 019

In the above picture you’ll notice I added a little pink ribbon to the top.  I did this because I thought they were missing a topper and I didn’t have any pom poms on hand in my craft supplies.  I tied little pieces of ribbon into bows and then used a sewing pin to gently attach the bow to the top of the onesie.  If you look closely, you can see the pearl head of the pin sticking out a little.  Next time I do this, I will probably invest in the little rose buds like shown in the inspiration picture I had.

Picture 018

To decorate the plain white cupcake box, I added some scrapbook paper to dress up the sides.  Again, this is optional, but I think it adds a nice touch. 

Picture 023

Once done with the box, I added the confetti filler to the inside bottom and then added the cupcakes on top.  You may have to squish the filler down a little so they all fit. 

01

After I was finished with the arrangement of the insides, I closed the box, tied some ribbon around it and added a little note.  Done!

02

This project probably took about 90 minutes or so – mostly because I was trying to perfect the rolling of the onesies.  Once you get the hang of that, they’re pretty easy to put together.  “Enjoy” your cupcakes :)

Sharing at: I Heart Naptime, Tatertots & Jello, Someday Crafts, Be Different, Act Normal

BlogSignature