Showing posts with label cuteness. Show all posts

Friday, December 13, 2013

Popsicle Invitations

Well I worked on these invitations back in April and I’m just getting around to posting a how-to now.  Since Toby wasn’t obsessed with anything in particular and I still wanted to do some kind of theme, I decided on something that was fun, colorful, and easy to put together.  Since he has a summer birthday, we hosted a summer picnic/BBQ using the classic gingham design, some polka-dots, and lots of primary colors.  When I was searching for birthday picnic ideas on Pinterest, the Teddy Bear Picnic theme came up a lot, but I strayed away from that as it seemed a little too feminine.

I saw a picture of popsicle invitations and fell in love – I knew it would be perfect to set the picnic theme.  They took some time to cut, punch, and actually put together but it was worth it, as they came out pretty cute.  Unfortunately the downside to these invitations was that the post office really took a beating on the envelopes – the popsicle sticks must have gotten stuck in the machines causing some of the invitations to get a little crumpled.  So if you decide to make something similar, I recommend passing these out in person rather than mailing, or talking to the post office about the most cost-effective way to get them out without being crushed. 

popsicleinvitationmaterials

I printed the invitations on 5x7 white cardstock cards (pre-cut).  For each invitation, I took an invitation card for the front and then used a scrapbook paper piece for the back.  I put the cards together like a sandwich and only put a glue dot in the top two corners to start.  However, for the top right corner I needed to make sure that it was placed low enough so I wouldn’t punch it out (see below photo).  I rounded the top left and bottom corners and used the 2” punch for the top right corner.

popsicleinvitationwhite2

I then separated the two paper pieces slightly so I could place the popsicle stick in the middle and centered on the back piece.  I then put a glue dot on top of the stick and also on the two bottom corners of the back piece.  Then I carefully laid the top invitation piece and smoothed everything so the glue dots stuck.

popsicleinvitationdots

Once I had these steps down, it wasn’t too difficult to make the rest.  Here’s what they looked like after they were done.  I loved that polka dot paper so much!

popsicleinvitationback

Wednesday, November 14, 2012

Random Cuteness

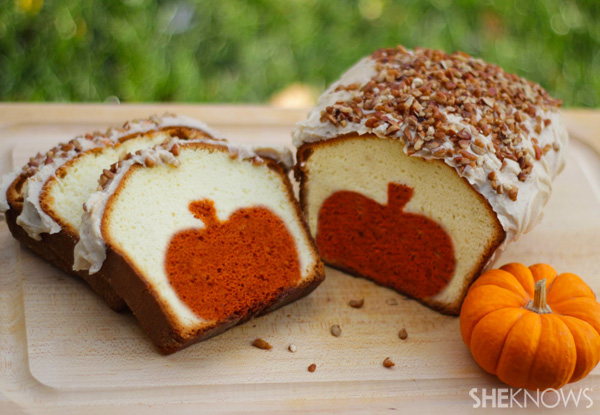
I never thought I would describe bread as adorable, but seriously, look at this little pound cake.  So cute!  I wouldn’t want to eat it:

image source

BlogSignature

Friday, August 24, 2012

Weekly Photo Recap: Weeks 8-9

iPhone photo dump from weeks 8-9:

Sly little smile

photo (18)

Sleeping smile

photo (19)

Smiling at his froggy on the activity mat

photo (20)

Nothing cuter than jean shorts and some little blue shoes

photo (12)

Dancing at the candlepin bowling alley

photo (13)

Looking like a little boy and not a baby!

photo (14)

Hanging out with his guys in the kitchen while Mommy makes dinner

photo (15)

Enjoying the warm breeze outside on the porch

photo (16)

Happy!

photo (17)

Keeping it classy in a polo

photo (1)

Listening to the cars go by with BFF Maggie

photo (2)

Checking himself out in the mirror

photo (3)

Cute little overalls

photo

BlogSignature

Wednesday, June 13, 2012

Sunflower Cupcakes

One of the results from my baking day yesterday:

sunflowers

Sunflowers!  They came out pretty cute, though, they use a TON of  frosting.  And I probably should have done a third level of leaves to cover up the bases of the Oreos a little more, but at that point I was pretty much done with frosting.  I found the original inspiration on Pinterest – these look much better than mine:


These were a total cheat – I used a yellow cake mix with a honey greek yogurt, 1 cup of water, and 1 egg white.  They baked for about 20 minutes at 350 degrees and then I frosted them with vanilla frosting out of the can.  I did mix in a little lemon pudding mix, lemon extract, and yellow food coloring to make the frosting more lemon flavored.  I used a Wilton leaf tip (I think it’s #352?) to frost and then stuck the Oreos on top.  I didn’t actually eat one but Sista and Hubby approved.  Unfortunately the frosting out of the can is very soft and not great for piping leaves.  If I were to make these again in the future, I would make an actual buttercream frosting that’s a little thicker.  And maybe attempt to add in some green leaves, as well.

It felt good to do some baking again!  Who knows when I’ll be able to make cupcakes in the future :)

BlogSignature

Monday, April 16, 2012

Monday Musings


Old Navy has some seriously cute clothes lately…and even though he received so many onesies and rompers at the shower, I may still do a little more shopping :)  For instance, this will be the story of me and Baby C’s life this summer…well he may have it a little easier than me, though…

image source

And I’m tempted to get this one, too, since he’ll be a little traveler.  We’re already planning a vacation to Maine when he’ll be about 2 months old:

image source

This one just make me LOL:

image source

Of course, no outfit would be complete without some flip-flops:

image source

Who said baby boy stuff wasn’t cute?  Haha I could go nuts with buying so many things for him :)  Luckily he was beyond spoiled at the shower – promise to post some recap pics this week!

SignatureBlog

Wednesday, February 29, 2012

Nautical Nursery – Cloud/Star Felt & Ribbon Mobile

The first DIY project is officially done and hanging proudly in the nursery!  Here is Baby C’s mobile, which is positioned right above the changing table (I still haven’t decided if I’ll do something above the crib, as well):

Week24 009

And a couple close-ups:

Week24 006

 Week24 007 

While this was pretty easy to put together, it took several days for it to be finally finished.  I suppose if I made myself work on it for more than a couple hours at a time, it would have only taken a couple days.  Basic materials include an embroidery hoop from the knitting section, lots and lots of ribbon (I used 5 different kinds), felt, cardstock, scrapbooking glue, and thin, clear filament string (from the jewelry section). 

I started by printing templates for the clouds and stars right from Microsoft Publisher onto cardstock.  After cutting them out, I used the templates to start cutting the felt.  I cut two pieces of felt for each star and each cloud.  Next I would glue one side of the cardstock to one felt piece.  Then I would glue the second felt piece on top of the cardstock, so it was like the cardstock template was in the middle of a felt sandwich.  I left the cardstock in the middle so that it was more sturdy.  Once those were dry, I used a tack to push a small hole through the top of each star and cloud.  The clear string was poked through and I tied a triple knot to secure it.  Then I would measure how long I wanted each string to be and tie them to the embroidery hoop with leaving an even amount of space  between each one.  I used a drop of clear nail polish to secure each knot.  And last but not least, I started cutting all the ribbon.  I tied each piece of ribbon around the hoop and made it into a knot, which faced the outside of the hoop.  This is definitely what took the longest – there’s a ton of ribbon on that hoop!

I’m really happy with how it came out, and considering I only spent about $10, that’s even better!  I think I would have preferred to use an even thinner string so it’s more “invisible” but this was all I had on hand and I refused to buy more string when I have so much already.

I think this would go so well with any nursery theme – if Baby C were a girl, I would have definitely done this in pink and green tones with butterflies instead of stars and clouds.

Sharing at Someday Crafts, I Heart Naptime, Be Different, Act Normal, Tatertots & Jello, Six Sisters’ Stuff

BlogSignature

Monday, January 23, 2012

Monday Musings

A little party inspiration + one of my all-time favorite books:

Source: hwtm.com via Emily on Pinterest


Goodnight Moon by Margaret Wise Brown
In the great green room
there was a telephone
and a red balloon
and a picture of...
The cow jumping over the moon
And there were three little bears sitting on chairs
And two little kittens and a pair of mittens
And a little toy house and a young mouse
And a comb and a brush and a bowl full of mush
And a quiet old lady who was whispering "hush"
Goodnight room goodnight room
Goodnight cow jumping over the moon
Goodnight light and the red balloon
Goodnight bears goodnight chairs
Goodnight kittens and goodnight mittens
Goodnight clocks and goodnight socks
Goodnight little house and goodnight mouse
Goodnight comb and goodnight brush
Goodnight nobody goodnight mush
And Goodnight to the old lady whispering "hush"
Goodnight stars goodnight air
Goodnight noises everywhere


BlogSignature

Sunday, January 15, 2012

Damn Cats

May 22 295

Hi.  My name is Maggie.  And while I may look cute and innocent, I’m far from it.  My newest obsession?  Pushing full glasses of drinks off Mom’s nightstand.  It’s my favorite new hobby.  I love watching it spill everywhere and the best part is I never have to clean it up!  I’m just preparing Mom and Dad for all the messes they will have to pick up once Baby C gets here ;)

BlogSignature

Wednesday, December 14, 2011

Christmas Goodies – Reindeer Cookies

When I first saw these Reindeer Cookies on Pinterest, I knew I had to make them this holiday season. 


And luckily my mom had a cookie swap a couple weeks ago so it was the perfect opportunity.  I couldn’t find mini M&M’s at my local supermarket so I decided to use chocolate chips for the eyes instead.   

December03 015

These are actually very easy to make – I used a basic peanut butter cookie recipe and then rolled them into one inch balls like you normally would do.  Then you pinch the bottom of the ball, place it on the cookie sheet, and gently flatten the entire cookie so you end up with an upside down triangle shape.  I did one batch first to see how they would bake and I was happy with the shape so I continued the process for the rest of the batch.  Though, comparing the inspiration cookies to mine, I may try to make them puffier next time and I’m not sure if I would make them as long. 

As soon as they come out of the oven, you want to immediately stick on the pretzel ears, then the eyes (don’t press down too much or else the chips will melt), and then the  red M&M nose.  So cute and this would be great to do with kids.

And now I know why I gained 2 pounds in a week…ohhhh Christmas cookies!

BlogSignature

Monday, November 21, 2011

Cake Inspiration – Swimming Pool

Remember how I made Hula Bear cupcakes and cake earlier this year?  Well I was just browsing Foodgawker and came across this picture for a swimming pool cake. 

image source from alanabread

It’s a very similar idea to what I did, minus the ocean theme, so I wouldn’t have to include the Nemo fruit snacks or chocolate flavored Goldfish.  I love the idea of adding the cookies around the base of the cake to make the actual pool.  And that candy ladder – oh it’s so cute!  After reading through the recipe, it’s a little unique because the blue filling is jelly…I think I would just skip that and do lots of frosting instead :)

Is it bad I’m already thinking of things to make for pool parties next summer?  We’re not even close to being started with winter yet…

BlogSignature

Tuesday, October 18, 2011